Panduan Autocad Land Desktop 2009 4w585t
This document was ed by and they confirmed that they have the permission to share it. If you are author or own the copyright of this book, please report to us by using this report form. Report 3i3n4
Overview 26281t
& View Panduan Autocad Land Desktop 2009 as PDF for free.
More details 6y5l6z
- Words: 1,986
- Pages: 64
Pembuatan File Baru
Autocad Civil 3D Land Desktop Companion 2009
Pembuatan File Baru
Autocad Civil 3D Land Desktop Companion 2009
Klik Pada Tanda Panah Kebawah
Autocad Civil 3D Land Desktop Companion 2009
A. Buka Program Autocad Civil 3D Land Desktop Companion 2009
Klik Pada Menu File,Pilih New Pembuatan File Baru
1. Ketik Nama Gambar 2. Klik Browse,Cari Lokasi Penyimpanan
3. Untuk Mengisi Project Name Klik Create Project
Autocad Civil 3D Land Desktop Companion 2009
B. Dialog Drawing Project Based
Pembuatan File Baru
3. Untuk Mewngisi Project Name Klik Create Project
4. Pada Prototype : Pilih Meter
5. Pada Name : Ketik Nama Proyek
7. Pada Select Drawing : Pilih Acad dwt.
8. Klik OK
Autocad Civil 3D Land Desktop Companion 2009
B. Dialog Drawing Project Based
6. Klik OK
Pembuatan File Baru
1. Pada Liniear Unit , Pilih Meter
D. Dialog Units 2. Pada Angle Display Style , Pilih North Azimuths
Autocad Civil 3D Land Desktop Companion 2009
C. Dialog Load Setting, Klik Next
Pembuatan File Baru
1. Pada Liniear Unit , Pilih Meter
D. Dialog Units 2. Pada Angle Display Style , Pilih North Azimuths 3. Klik Next
Autocad Civil 3D Land Desktop Companion 2009
C. Dialog Load Setting, Klik Next
Pembuatan File Baru
1. Skala Horizontalnya
2. Skala Verticalnya
3. Skala Ketas
3. Klik Next
Autocad Civil 3D Land Desktop Companion 2009
E. Dialog Scale
Pembuatan File Baru
1. Pada Categories ,Pilih Indonesia
2. CS Code : IN-SAM
Autocad Civil 3D Land Desktop Companion 2009
F. Dialog Zone
3. Klik Next Pembuatan File Baru
1. Klik Standard saja
H. Dialog Text Style, Klik Next
Autocad Civil 3D Land Desktop Companion 2009
G. Dialog Orientation, Klik Next
Pembuatan File Baru
J. Dialog Save Setting, Klik Finish
Autocad Civil 3D Land Desktop Companion 2009
I. Dialog Border, Klik Next
Pembuatan File Baru
L. Dialog Create Point Database, Centang Use Point Names, OK 1. Centang Use Point Names
Autocad Civil 3D Land Desktop Companion 2009
K. Dialog Finish, Klik OK
Pembuatan File Baru
Input Data ( Import / Export Point )
Autocad Civil 3D Land Desktop Companion 2009
1. Dialog Point Settings, Coords
1. Pada Coord, Pilih X-Y
Autocad Civil 3D Land Desktop Companion 2009
A. Setting Point, Menu Point – Pilih Point Setting
Input Data ( Import / Export Point )
Atur Skala Marker
Autocad Civil 3D Land Desktop Companion 2009
1. Dialog Point Settings , Marker
Input Data ( Import / Export Point )
Atur Skala Textnya
Autocad Civil 3D Land Desktop Companion 2009
1. Dialog Point Settings, Text
Input Data ( Import / Export Point )
Data yang perlu disiapkan sebelum mengIMPORT POINT, 1. Masukan data dari survey kedalam Program Ms.Excel, ( Mengetik Ulang data koordinat yang didapat dari survey ).
Autocad Civil 3D Land Desktop Companion 2009
B. Import Point, Menu Points – Import / Export Points – Import Points
Input Data ( Import / Export Point )
2. Copykan data tersebut kedalam Text Document / Notpad.
Program Excel
Text Document / Notpad / Wordpad
3. Simapanlah data tersebut dalam Folder tersendiri, Sesuai dengan nama proyeknya. 4. Dan keluarlah / Close data tersebut.
Autocad Civil 3D Land Desktop Companion 2009
B. Import Point, Menu Points – Import / Export Points – Import Points
Input Data ( Import / Export Point )
1. Format : PENZD ( Space delimited )
2. Pada Source File : Carilah File data Countour yg sudah dalam bentuk Notpad
6. Dialog Import Points
Autocad Civil 3D Land Desktop Companion 2009
B. Import Point, Menu Points – Import / Export Points – Import Points 5. MengIMPORT POINTS data yang sudah dalam bentuk Notpad diatas.
3. Klik OK Input Data ( Import / Export Point )
Klik OK
Autocad Civil 3D Land Desktop Companion 2009
B. Import Point, Menu Points – Import / Export Points – Import Points 7. Dialog COGO Database Import Options
Setelah Klik OK, Tunggu Loadingnya, kemudian Zoom Extenlah Supaya data yang diImport terlihat dengan jelas. Input Data ( Import / Export Point )
Proses Pembuatan Countur
Autocad Civil 3D Land Desktop Companion 2009
1. Klik pada Manager pilih Create Surface
2. Klik pada tanda ( + )
3. Klik Kanan Pada Points File ,Pilih Add Point File
Autocad Civil 3D Land Desktop Companion 2009
1. Pembuatan Surface, Pada Menu Terrain , Pilih Terrain Model Explorer. a. Dialog Terrain Model Explorer
Proses Pembuatan Countur
1. Format : PENZD ( Space delimited )
2. Pada Source File : Carilah File data Countour yg sudah dalam bentuk Notpad
3. Klik OK
Autocad Civil 3D Land Desktop Companion 2009
b. Dialog Format Manager – Read Points
Proses Pembuatan Countur
Pilih Build
Autocad Civil 3D Land Desktop Companion 2009
c. Klik kanan pada Surface 1, pilih Build
Proses Pembuatan Countur
Autocad Civil 3D Land Desktop Companion 2009
d.Dialog Build Surface 1
Centang Centang
Centang Centang Centang
Centang Klik OK
Centang
Klik Apply
Proses Pembuatan Countur
Klik OK
f. Tutup / Closelah Dialog Terrain Model Explorer
Autocad Civil 3D Land Desktop Companion 2009
e.Dialog Build Progress , Klik OK
Proses Pembuatan Countur
- Dialog Create Countur Masukan Elevasi Terendah
Masukan Elevasi Tertinggi
Klik OK
Catatan : Minor Interval adalah Jarak Antar Garis Countur Mayor Interval adalah Jarak Antar garis Countur, yang berkelipan 5 dari Minor Interval
Autocad Civil 3D Land Desktop Companion 2009
2. Pembuatan Countur , Pada Menu Terrain, Pilih Create Countur
Proses Pembuatan Countur
-
-
Setelah Klik OK , pada Command dibawah “ Erase Old Counturs ( yes or no )” Ketik Y, Kemudian tekan Enter ,maka muncullah garis-garis countur. Kali ini proses pembuatan countur selesai…
Autocad Civil 3D Land Desktop Companion 2009
2. Pembuatan Countur , Pada Menu Terrain, Pilih Create Countur
Proses Pembuatan Countur
Pembuatan label Elevasi countur
Autocad Civil 3D Land Desktop Companion 2009
Autocad Civil 3D Land Desktop Companion 2009
A. Pembuatan Label Elevasi Countur , Pada Menu Terrain, Pilih Countur Label ,dan Pilih Group Interioer. Muncul dialog Countur Labels – Increments - OK
Pembuatan label Elevasi countur
Ending Countur
Autocad Civil 3D Land Desktop Companion 2009
A. Pembuatan Label Elevasi Countur , Select garis Countur Seperti Pada gambar
Klik Pada garis pertama Pembuatan label Elevasi countur
Pembuatan Label Station
Autocad Civil 3D Land Desktop Companion 2009
Double Klik Pada Map Geneal Klik OK
Tekan Enter
Klik Apply
Autocad Civil 3D Land Desktop Companion 2009
Cara Memperbesar Angka Label Station - Setting Menu : Options – Profile – double Klik Pada Map General Aplly - OK
Pembuatan Label Station
Pilih Menu Format – Text style – Aturlah Height ( Tinggi Textnya Apply - Close
Klik Close
Autocad Civil 3D Land Desktop Companion 2009
-
Klik Apply Pembuatan Label Station
Ketik Jarak STA
Ketik Jarak Angka STA Klik OK
Autocad Civil 3D Land Desktop Companion 2009
b. Pembuatan Labels Station , - Pilih Menu Alignment – Station Label Setting
Pembuatan Label Station
Tekan Enter
Tekan Enter
Autocad Civil 3D Land Desktop Companion 2009
b. Pembuatan Labels Station , - Pilih Menu Alignment – Create Labels Station Pada Command “ Baginning Station < 0.000 > Tekan Enter Pada Command “ Ending Station < ……..> Tekan Enter
Pembuatan Label Station
Pada Command Bawah, “ Delete Existing Station Stationing layers ( Yes / No )….Ketik Yess / Y – Tekan Enter
Hasil dari Label Station
Tekan Enter
Autocad Civil 3D Land Desktop Companion 2009
-
Pembuatan Label Station
Pembuatan Grid
Autocad Civil 3D Land Desktop Companion 2009
Garis Vertikal Garis Horizontal
Autocad Civil 3D Land Desktop Companion 2009
1. Buatlah Garis Polyline pada Masing – Masing STA,Horizontal maupun Vertikal Seperti Contoh dibawah ini.
Pembuatan Grid
Long Section Autocad Civil 3D Land Desktop Companion 2009
1. Pembuatan Garis Alignments,Buatlah Garis Secara Polyline Seperti pada gambar dibawah ( Warna Biru ) Klik Garis Polyline
Pembuatan Garis Alignments
Autocad Civil 3D Land Desktop Companion 2009
Langkah – Langkah Sebelum Membuat Long Section :
Klik Garis Polyline
Pembuatan Garis Alignments
Autocad Civil 3D Land Desktop Companion 2009
a. Pilih Menu Alignment, Define From Polyline, Klik Garis Polyline pada command dibawah “ Enter For Start “ Tekan Enter, Muncul Dialog “ Define Alignment “ Isi alignmen Name, isi Description, Pada Starting Station Ketik “ 0 “ ( Nol ) - OK
Long Section
Autocad Civil 3D Land Desktop Companion 2009
2. Rubahlah ke Land Desktop,Dengan cara Ketik Option ( OP ) Pilih Profile , pada Available profile pilih “ Land Desktop “ dan Double Cliklah – Apply - OK
Autocad Civil 3D Land Desktop Companion 2009
Cara Mengatur Skala Hasil Long Section:
Long Section
Autocad Civil 3D Land Desktop Companion 2009
4. Pilih Menu profiles – Surfaces – Set Currents Surface Select Surface 1 - OK
Long Section
Klik Garis Polyline Long Section
Autocad Civil 3D Land Desktop Companion 2009
5. Pilih Menu profiles – Existing Ground – Sample From Surface Klik Garis Polyline - OK
Tekan Enter
Pada Command dibawah “ Ending Station <……..> - Tekan Enter
Tekan Enter Long Section
Autocad Civil 3D Land Desktop Companion 2009
Pada Command dibawah “ Beginning Station <0.00> - Tekan Enter
Autocad Civil 3D Land Desktop Companion 2009
6. Pilih menu Profiles – Create Profile – Full Profile – Centang Import grid - OK
Long Section
Tekan Enter
Long Section
Autocad Civil 3D Land Desktop Companion 2009
Pada Command dibawah “ Select Starting Point “ Maka Kliklah disembarang tempat atau sesuai keinginan. Pada Command dibaawah “ Delete Existing Profile Layer “ ( Yes / No ) Maka Ketik Y atau Yes – Tekan Enter
Autocad Civil 3D Land Desktop Companion 2009
Maka Hasilnya
Pelajaran Membuat Long Section Sudah Selesai
Long Section
Cross Section Autocad Civil 3D Land Desktop Companion 2009
Autocad Civil 3D Land Desktop Companion 2009
1. Pengaturan Skala Cross Section
Cross Section
Autocad Civil 3D Land Desktop Companion 2009
2. Pilih Menu Alignment – Set Current Alignment – Klik Garis Polylinenya
Cross Section
Cross Section
Autocad Civil 3D Land Desktop Companion 2009
3. Rubahlah ke Land Desktop,Dengan cara Ketik Option ( OP ) Pilih Profile , pada Available profile pilih “ Land Desktop “ dan Double Cliklah – Apply - OK
Cross Section
Autocad Civil 3D Land Desktop Companion 2009
4. Pada Menu Cross Section – Surfaces – Pilih Set Current Surface Klik pada Surface 1 - OK
Kekanan & Kiri
Cross Section Per 25 Meter Cross Section
Autocad Civil 3D Land Desktop Companion 2009
5. Pilih Menu Cross Section – Existing Ground – Pilih Sample Frome Surface Lebar Arah Cross Section
Tekan Enter
Pada Command dibawah “ Ending Station <………> Tekan Enter
Tekan Enter
Cross Section
Autocad Civil 3D Land Desktop Companion 2009
Pada Command dibawah “ Beginning Station <0.00> Tekan Enter
Pada Command dibawah “ Overwrite Existing Section data ( Yes / No ) Ketik Y – Tekan Enter Autocad Civil 3D Land Desktop Companion 2009
Tekan Enter
6. Pilih Menu Cross Section – Section Plot – ALL –
Cross Section
Tekan Enter
Pada Command dibawah “ Ending Station < …..> Tekan Enter
Tekan Enter Cross Section
Autocad Civil 3D Land Desktop Companion 2009
Pada Command dibawah “ Beginning Station < …..> Tekan Enter
Autocad Civil 3D Land Desktop Companion 2009
Pada Command dibawah “ Sheet Origin Point “ – Klik Disembarang tempat Sesuai Keinginan
Cross Section
Autocad Civil 3D Land Desktop Companion 2009
Hasil dari Cross Section
Pelajaran Membuat Cross Section Sudah Selesai
Cross Section
Area Fill ( Timbunan ) M2
Garis Rencana Lahan
Autocad Civil 3D Land Desktop Companion 2009
Area Cut ( Galian ) M2
Perhitungan Volume Cut & Fill
Autocad Civil 3D Land Desktop Companion 2009
Hasil Perhitungan Volume Cut & Fill
Perhitungan Volume Cut & Fill Ini diaplikasikan kedalam Program Ms.Excel
Perhitungan Volume Cut & Fill
Angka Ini Diambil dari gbr autocad dgn Satuan Luasan M2 ( Area ) Angka Ini Diambil dari Jumlah Antara Vol. STA Awal & berikutnya dibagi 2
Angka Ini Diambil dari Perkalian Antara Luas Rata-Rata dengan Jarak Angka Ini Diambil dari Jarak Per STAnya
Autocad Civil 3D Land Desktop Companion 2009
Cara Perhitungan Volume Cut & Fill :
Perhitungan Volume Cut & Fill
Autocad Civil 3D Land Desktop Companion 2009
Pembuatan File Baru
Autocad Civil 3D Land Desktop Companion 2009
Klik Pada Tanda Panah Kebawah
Autocad Civil 3D Land Desktop Companion 2009
A. Buka Program Autocad Civil 3D Land Desktop Companion 2009
Klik Pada Menu File,Pilih New Pembuatan File Baru
1. Ketik Nama Gambar 2. Klik Browse,Cari Lokasi Penyimpanan
3. Untuk Mengisi Project Name Klik Create Project
Autocad Civil 3D Land Desktop Companion 2009
B. Dialog Drawing Project Based
Pembuatan File Baru
3. Untuk Mewngisi Project Name Klik Create Project
4. Pada Prototype : Pilih Meter
5. Pada Name : Ketik Nama Proyek
7. Pada Select Drawing : Pilih Acad dwt.
8. Klik OK
Autocad Civil 3D Land Desktop Companion 2009
B. Dialog Drawing Project Based
6. Klik OK
Pembuatan File Baru
1. Pada Liniear Unit , Pilih Meter
D. Dialog Units 2. Pada Angle Display Style , Pilih North Azimuths
Autocad Civil 3D Land Desktop Companion 2009
C. Dialog Load Setting, Klik Next
Pembuatan File Baru
1. Pada Liniear Unit , Pilih Meter
D. Dialog Units 2. Pada Angle Display Style , Pilih North Azimuths 3. Klik Next
Autocad Civil 3D Land Desktop Companion 2009
C. Dialog Load Setting, Klik Next
Pembuatan File Baru
1. Skala Horizontalnya
2. Skala Verticalnya
3. Skala Ketas
3. Klik Next
Autocad Civil 3D Land Desktop Companion 2009
E. Dialog Scale
Pembuatan File Baru
1. Pada Categories ,Pilih Indonesia
2. CS Code : IN-SAM
Autocad Civil 3D Land Desktop Companion 2009
F. Dialog Zone
3. Klik Next Pembuatan File Baru
1. Klik Standard saja
H. Dialog Text Style, Klik Next
Autocad Civil 3D Land Desktop Companion 2009
G. Dialog Orientation, Klik Next
Pembuatan File Baru
J. Dialog Save Setting, Klik Finish
Autocad Civil 3D Land Desktop Companion 2009
I. Dialog Border, Klik Next
Pembuatan File Baru
L. Dialog Create Point Database, Centang Use Point Names, OK 1. Centang Use Point Names
Autocad Civil 3D Land Desktop Companion 2009
K. Dialog Finish, Klik OK
Pembuatan File Baru
Input Data ( Import / Export Point )
Autocad Civil 3D Land Desktop Companion 2009
1. Dialog Point Settings, Coords
1. Pada Coord, Pilih X-Y
Autocad Civil 3D Land Desktop Companion 2009
A. Setting Point, Menu Point – Pilih Point Setting
Input Data ( Import / Export Point )
Atur Skala Marker
Autocad Civil 3D Land Desktop Companion 2009
1. Dialog Point Settings , Marker
Input Data ( Import / Export Point )
Atur Skala Textnya
Autocad Civil 3D Land Desktop Companion 2009
1. Dialog Point Settings, Text
Input Data ( Import / Export Point )
Data yang perlu disiapkan sebelum mengIMPORT POINT, 1. Masukan data dari survey kedalam Program Ms.Excel, ( Mengetik Ulang data koordinat yang didapat dari survey ).
Autocad Civil 3D Land Desktop Companion 2009
B. Import Point, Menu Points – Import / Export Points – Import Points
Input Data ( Import / Export Point )
2. Copykan data tersebut kedalam Text Document / Notpad.
Program Excel
Text Document / Notpad / Wordpad
3. Simapanlah data tersebut dalam Folder tersendiri, Sesuai dengan nama proyeknya. 4. Dan keluarlah / Close data tersebut.
Autocad Civil 3D Land Desktop Companion 2009
B. Import Point, Menu Points – Import / Export Points – Import Points
Input Data ( Import / Export Point )
1. Format : PENZD ( Space delimited )
2. Pada Source File : Carilah File data Countour yg sudah dalam bentuk Notpad
6. Dialog Import Points
Autocad Civil 3D Land Desktop Companion 2009
B. Import Point, Menu Points – Import / Export Points – Import Points 5. MengIMPORT POINTS data yang sudah dalam bentuk Notpad diatas.
3. Klik OK Input Data ( Import / Export Point )
Klik OK
Autocad Civil 3D Land Desktop Companion 2009
B. Import Point, Menu Points – Import / Export Points – Import Points 7. Dialog COGO Database Import Options
Setelah Klik OK, Tunggu Loadingnya, kemudian Zoom Extenlah Supaya data yang diImport terlihat dengan jelas. Input Data ( Import / Export Point )
Proses Pembuatan Countur
Autocad Civil 3D Land Desktop Companion 2009
1. Klik pada Manager pilih Create Surface
2. Klik pada tanda ( + )
3. Klik Kanan Pada Points File ,Pilih Add Point File
Autocad Civil 3D Land Desktop Companion 2009
1. Pembuatan Surface, Pada Menu Terrain , Pilih Terrain Model Explorer. a. Dialog Terrain Model Explorer
Proses Pembuatan Countur
1. Format : PENZD ( Space delimited )
2. Pada Source File : Carilah File data Countour yg sudah dalam bentuk Notpad
3. Klik OK
Autocad Civil 3D Land Desktop Companion 2009
b. Dialog Format Manager – Read Points
Proses Pembuatan Countur
Pilih Build
Autocad Civil 3D Land Desktop Companion 2009
c. Klik kanan pada Surface 1, pilih Build
Proses Pembuatan Countur
Autocad Civil 3D Land Desktop Companion 2009
d.Dialog Build Surface 1
Centang Centang
Centang Centang Centang
Centang Klik OK
Centang
Klik Apply
Proses Pembuatan Countur
Klik OK
f. Tutup / Closelah Dialog Terrain Model Explorer
Autocad Civil 3D Land Desktop Companion 2009
e.Dialog Build Progress , Klik OK
Proses Pembuatan Countur
- Dialog Create Countur Masukan Elevasi Terendah
Masukan Elevasi Tertinggi
Klik OK
Catatan : Minor Interval adalah Jarak Antar Garis Countur Mayor Interval adalah Jarak Antar garis Countur, yang berkelipan 5 dari Minor Interval
Autocad Civil 3D Land Desktop Companion 2009
2. Pembuatan Countur , Pada Menu Terrain, Pilih Create Countur
Proses Pembuatan Countur
-
-
Setelah Klik OK , pada Command dibawah “ Erase Old Counturs ( yes or no )” Ketik Y, Kemudian tekan Enter ,maka muncullah garis-garis countur. Kali ini proses pembuatan countur selesai…
Autocad Civil 3D Land Desktop Companion 2009
2. Pembuatan Countur , Pada Menu Terrain, Pilih Create Countur
Proses Pembuatan Countur
Pembuatan label Elevasi countur
Autocad Civil 3D Land Desktop Companion 2009
Autocad Civil 3D Land Desktop Companion 2009
A. Pembuatan Label Elevasi Countur , Pada Menu Terrain, Pilih Countur Label ,dan Pilih Group Interioer. Muncul dialog Countur Labels – Increments - OK
Pembuatan label Elevasi countur
Ending Countur
Autocad Civil 3D Land Desktop Companion 2009
A. Pembuatan Label Elevasi Countur , Select garis Countur Seperti Pada gambar
Klik Pada garis pertama Pembuatan label Elevasi countur
Pembuatan Label Station
Autocad Civil 3D Land Desktop Companion 2009
Double Klik Pada Map Geneal Klik OK
Tekan Enter
Klik Apply
Autocad Civil 3D Land Desktop Companion 2009
Cara Memperbesar Angka Label Station - Setting Menu : Options – Profile – double Klik Pada Map General Aplly - OK
Pembuatan Label Station
Pilih Menu Format – Text style – Aturlah Height ( Tinggi Textnya Apply - Close
Klik Close
Autocad Civil 3D Land Desktop Companion 2009
-
Klik Apply Pembuatan Label Station
Ketik Jarak STA
Ketik Jarak Angka STA Klik OK
Autocad Civil 3D Land Desktop Companion 2009
b. Pembuatan Labels Station , - Pilih Menu Alignment – Station Label Setting
Pembuatan Label Station
Tekan Enter
Tekan Enter
Autocad Civil 3D Land Desktop Companion 2009
b. Pembuatan Labels Station , - Pilih Menu Alignment – Create Labels Station Pada Command “ Baginning Station < 0.000 > Tekan Enter Pada Command “ Ending Station < ……..> Tekan Enter
Pembuatan Label Station
Pada Command Bawah, “ Delete Existing Station Stationing layers ( Yes / No )….Ketik Yess / Y – Tekan Enter
Hasil dari Label Station
Tekan Enter
Autocad Civil 3D Land Desktop Companion 2009
-
Pembuatan Label Station
Pembuatan Grid
Autocad Civil 3D Land Desktop Companion 2009
Garis Vertikal Garis Horizontal
Autocad Civil 3D Land Desktop Companion 2009
1. Buatlah Garis Polyline pada Masing – Masing STA,Horizontal maupun Vertikal Seperti Contoh dibawah ini.
Pembuatan Grid
Long Section Autocad Civil 3D Land Desktop Companion 2009
1. Pembuatan Garis Alignments,Buatlah Garis Secara Polyline Seperti pada gambar dibawah ( Warna Biru ) Klik Garis Polyline
Pembuatan Garis Alignments
Autocad Civil 3D Land Desktop Companion 2009
Langkah – Langkah Sebelum Membuat Long Section :
Klik Garis Polyline
Pembuatan Garis Alignments
Autocad Civil 3D Land Desktop Companion 2009
a. Pilih Menu Alignment, Define From Polyline, Klik Garis Polyline pada command dibawah “ Enter For Start “ Tekan Enter, Muncul Dialog “ Define Alignment “ Isi alignmen Name, isi Description, Pada Starting Station Ketik “ 0 “ ( Nol ) - OK
Long Section
Autocad Civil 3D Land Desktop Companion 2009
2. Rubahlah ke Land Desktop,Dengan cara Ketik Option ( OP ) Pilih Profile , pada Available profile pilih “ Land Desktop “ dan Double Cliklah – Apply - OK
Autocad Civil 3D Land Desktop Companion 2009
Cara Mengatur Skala Hasil Long Section:
Long Section
Autocad Civil 3D Land Desktop Companion 2009
4. Pilih Menu profiles – Surfaces – Set Currents Surface Select Surface 1 - OK
Long Section
Klik Garis Polyline Long Section
Autocad Civil 3D Land Desktop Companion 2009
5. Pilih Menu profiles – Existing Ground – Sample From Surface Klik Garis Polyline - OK
Tekan Enter
Pada Command dibawah “ Ending Station <……..> - Tekan Enter
Tekan Enter Long Section
Autocad Civil 3D Land Desktop Companion 2009
Pada Command dibawah “ Beginning Station <0.00> - Tekan Enter
Autocad Civil 3D Land Desktop Companion 2009
6. Pilih menu Profiles – Create Profile – Full Profile – Centang Import grid - OK
Long Section
Tekan Enter
Long Section
Autocad Civil 3D Land Desktop Companion 2009
Pada Command dibawah “ Select Starting Point “ Maka Kliklah disembarang tempat atau sesuai keinginan. Pada Command dibaawah “ Delete Existing Profile Layer “ ( Yes / No ) Maka Ketik Y atau Yes – Tekan Enter
Autocad Civil 3D Land Desktop Companion 2009
Maka Hasilnya
Pelajaran Membuat Long Section Sudah Selesai
Long Section
Cross Section Autocad Civil 3D Land Desktop Companion 2009
Autocad Civil 3D Land Desktop Companion 2009
1. Pengaturan Skala Cross Section
Cross Section
Autocad Civil 3D Land Desktop Companion 2009
2. Pilih Menu Alignment – Set Current Alignment – Klik Garis Polylinenya
Cross Section
Cross Section
Autocad Civil 3D Land Desktop Companion 2009
3. Rubahlah ke Land Desktop,Dengan cara Ketik Option ( OP ) Pilih Profile , pada Available profile pilih “ Land Desktop “ dan Double Cliklah – Apply - OK
Cross Section
Autocad Civil 3D Land Desktop Companion 2009
4. Pada Menu Cross Section – Surfaces – Pilih Set Current Surface Klik pada Surface 1 - OK
Kekanan & Kiri
Cross Section Per 25 Meter Cross Section
Autocad Civil 3D Land Desktop Companion 2009
5. Pilih Menu Cross Section – Existing Ground – Pilih Sample Frome Surface Lebar Arah Cross Section
Tekan Enter
Pada Command dibawah “ Ending Station <………> Tekan Enter
Tekan Enter
Cross Section
Autocad Civil 3D Land Desktop Companion 2009
Pada Command dibawah “ Beginning Station <0.00> Tekan Enter
Pada Command dibawah “ Overwrite Existing Section data ( Yes / No ) Ketik Y – Tekan Enter Autocad Civil 3D Land Desktop Companion 2009
Tekan Enter
6. Pilih Menu Cross Section – Section Plot – ALL –
Cross Section
Tekan Enter
Pada Command dibawah “ Ending Station < …..> Tekan Enter
Tekan Enter Cross Section
Autocad Civil 3D Land Desktop Companion 2009
Pada Command dibawah “ Beginning Station < …..> Tekan Enter
Autocad Civil 3D Land Desktop Companion 2009
Pada Command dibawah “ Sheet Origin Point “ – Klik Disembarang tempat Sesuai Keinginan
Cross Section
Autocad Civil 3D Land Desktop Companion 2009
Hasil dari Cross Section
Pelajaran Membuat Cross Section Sudah Selesai
Cross Section
Area Fill ( Timbunan ) M2
Garis Rencana Lahan
Autocad Civil 3D Land Desktop Companion 2009
Area Cut ( Galian ) M2
Perhitungan Volume Cut & Fill
Autocad Civil 3D Land Desktop Companion 2009
Hasil Perhitungan Volume Cut & Fill
Perhitungan Volume Cut & Fill Ini diaplikasikan kedalam Program Ms.Excel
Perhitungan Volume Cut & Fill
Angka Ini Diambil dari gbr autocad dgn Satuan Luasan M2 ( Area ) Angka Ini Diambil dari Jumlah Antara Vol. STA Awal & berikutnya dibagi 2
Angka Ini Diambil dari Perkalian Antara Luas Rata-Rata dengan Jarak Angka Ini Diambil dari Jarak Per STAnya
Autocad Civil 3D Land Desktop Companion 2009
Cara Perhitungan Volume Cut & Fill :
Perhitungan Volume Cut & Fill
Related Documents 3h463d

Panduan Autocad Land Desktop 2009 4w585t
September 2020 0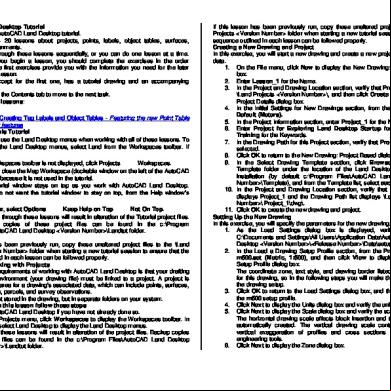
Autocad Land Desktop Tutorial 174j66
December 2019 56
Land Desktop 2009 Tutorials 3x42n
November 2019 51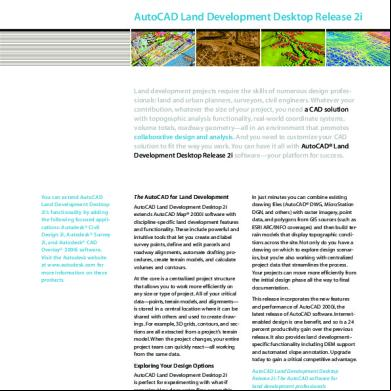
Autocad Land Development Desktop Brochure 5c6o2g
November 2019 54
Panduan Belajar Autocad Land Development 2009 3072s
February 2021 0
Keygen Autocad Land Desktop 2009 64 Bit 2i124k
December 2019 206More Documents from "danish" 5jm
Panduan Autocad Land Desktop 2009 4w585t
September 2020 0
15553 4y6sc
December 2021 0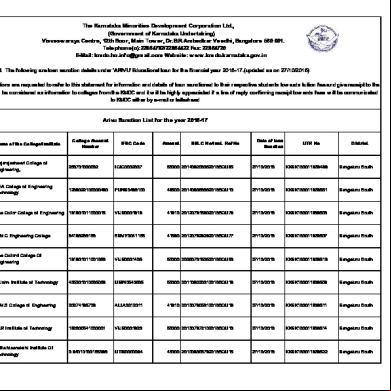
Arivu San List 38l2b
December 2019 311
Data Structure 1 Hindi 1o713w
December 2019 86
Pdh Sdh Presentation[1] 4m1w6o
December 2019 26